Introduction
If you’re a fan of rich, indulgent desserts that combine the best of cake and candy, then this Butterfinger Cake recipe is a must-try. It’s the perfect treat for a special occasion or just when you’re craving something sweet and satisfying. Imagine a moist chocolate cake, soaked in caramel and condensed milk, then topped with whipped cream and crushed Butterfinger candy bars. The result is a decadent dessert that will have everyone asking for seconds. Whether you’re a seasoned baker or a novice in the kitchen, this Butterfinger Cake is both easy to make and utterly irresistible.
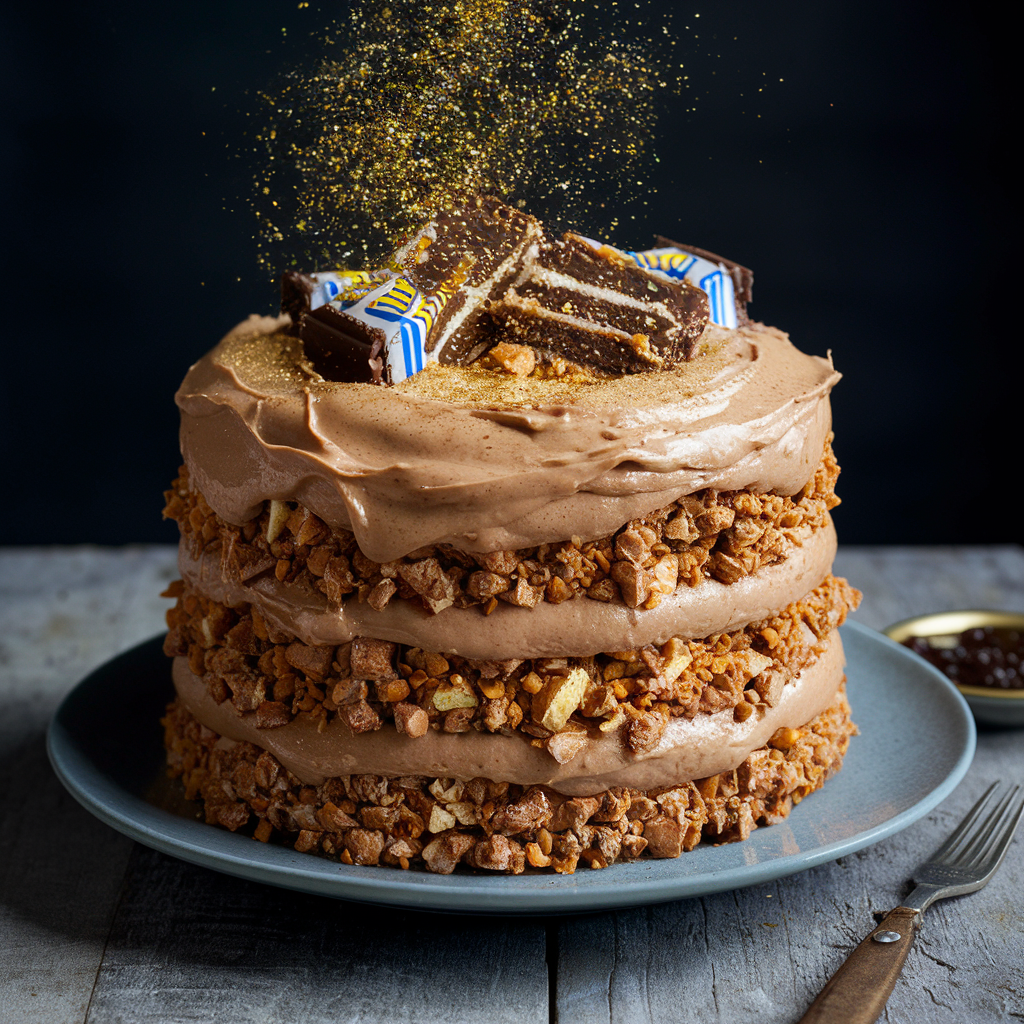
Ingredients You’ll Need for the Perfect Butterfinger Cake
For the Butterfinger Cake Base
- 1 box of chocolate cake mix (or your favorite homemade chocolate cake recipe)
- 1 cup of water
- 1/3 cup of vegetable oil
- 3 large eggs
Toppings to Elevate Your Butterfinger Cake Recipe
- 1 can (14 ounces) sweetened condensed milk
- 1 jar (12 ounces) caramel sauce or topping
- 1 tub (8 ounces) whipped topping (such as Cool Whip), thawed
- 4-6 Butterfinger candy bars, crushed
Why These Ingredients Make the Best Butterfinger Cake Recipe ?
Each ingredient in this Butterfinger Cake plays a crucial role in creating the perfect texture and flavor:
- Chocolate Cake Mix: While you can opt for a homemade chocolate cake, using a boxed mix saves time and ensures consistency. The rich chocolate flavor pairs perfectly with the sweet and crunchy Butterfinger topping.
- Sweetened Condensed Milk: This thick, sweet milk is essential for adding moisture and sweetness to the cake. It seeps into the cake, making it incredibly moist and flavorful.
- Caramel Sauce: Caramel adds a buttery, sweet layer to the cake that complements the chocolate and peanut butter flavors. It’s the glue that holds all the delicious layers together.
- Whipped Topping: Light and fluffy, whipped topping balances the richness of the cake and the sweetness of the caramel and condensed milk. It also provides a smooth surface for the crushed Butterfinger candy.
- Butterfinger Candy Bars: The star of the show, Butterfinger bars add crunch and a distinct peanut butter flavor. Crushing them and sprinkling them on top ensures you get that delightful crunch in every bite.
Step-by-Step Instructions for Making Butterfinger Cake
1. Prepare the Butterfinger Cake Batter
Start by preheating your oven to 350°F (175°C). Grease and flour a 9×13-inch baking pan. Prepare the chocolate cake mix according to the package instructions. This typically involves combining the cake mix with water, oil, and eggs. Mix until smooth, then pour the batter into the prepared pan. Bake the cake for 30-35 minutes, or until a toothpick inserted into the center comes out clean.
2. Poke Holes in the Cake
Once the cake is baked, remove it from the oven and allow it to cool for about 10 minutes. While the cake is still warm, use the handle of a wooden spoon or a similar tool to poke holes all over the cake. These holes will allow the condensed milk and caramel to seep into the cake, making it incredibly moist and flavorful.
3. Pour the Sweetened Condensed Milk and Caramel
After poking holes in the cake, pour the sweetened condensed milk over the top, making sure it seeps into the holes. Follow this by drizzling the caramel sauce evenly over the cake. Use a spatula or the back of a spoon to spread the caramel and condensed milk evenly if needed. This step is crucial for ensuring the cake absorbs all the delicious flavors.
4. Allow the Cake to Cool Completely
Before adding the whipped topping and Butterfinger pieces, let the cake cool completely. This can take about an hour. If you’re in a hurry, you can place the cake in the refrigerator to speed up the cooling process. Cooling is important because if the cake is too warm, the whipped topping will melt, and the Butterfinger pieces might lose their crunch.
5. Whipped Topping and Crushed Butterfinger Bars
Once the cake is completely cool, spread the thawed whipped topping evenly over the top. The whipped topping adds a light, airy texture that contrasts beautifully with the rich, dense cake.
6. Crush the Butterfinger Candy Bars
Place the Butterfinger candy bars in a resealable plastic bag and crush them using a rolling pin or a heavy object. You can crush them into fine pieces or leave some larger chunks for added texture. Sprinkle the crushed Butterfinger evenly over the whipped topping. The combination of creamy whipped topping and crunchy Butterfinger is what makes this cake so special.
7. Chill and Serve
For the best flavor and texture, chill the cake in the refrigerator for at least 2 hours before serving. This allows the flavors to meld together, and the cake to set properly. When ready to serve, cut into squares and enjoy!
Variations and Tips for Your Butterfinger Cake Recipe
Homemade Chocolate Cake for Your Butterfinger Cake
If you prefer to make your cake from scratch, you can substitute the boxed mix with your favorite homemade chocolate cake recipe. A rich, moist chocolate cake made with buttermilk or sour cream would be an excellent base for this Butterfinger Cake.
Different Candy Options for Your Butterfinger Cake Recipe
While Butterfinger is the star, you can experiment with other candy bars as well. Try using Snickers for a caramel and peanut twist, or Heath bars for a toffee flavor. The possibilities are endless!
Make-Ahead Tips
This cake is perfect for making ahead of time. You can bake the cake, add the condensed milk and caramel, and then cover it and refrigerate for up to a day. Add the whipped topping and Butterfinger pieces just before serving to ensure they stay fresh and crunchy.
Storing Leftovers
Store any leftover cake in an airtight container in the refrigerator. It will keep well for 3-4 days, though the Butterfinger pieces may lose some of their crunch over time. For best results, add fresh Butterfinger pieces to each serving.
Pairing Suggestions: Perfect Complements to Your Butterfinger Cake
Beverages
Pair this Butterfinger Cake with a cold glass of milk or a hot cup of coffee. The milk helps to balance the sweetness, while coffee’s bitterness contrasts nicely with the rich, sweet flavors.
Ice Cream
Serve a slice of Butterfinger Cake with a scoop of vanilla ice cream for an extra indulgent treat. The cold, creamy ice cream pairs perfectly with the rich, chocolatey cake.
Nutritional Information for Butterfinger Cake
While this Butterfinger Cake is undeniably delicious, it’s also quite rich. Here’s a breakdown of the approximate nutritional content per serving (based on 12 servings):
- Calories: 450
- Total Fat: 22g
- Saturated Fat: 10g
- Cholesterol: 60mg
- Sodium: 400mg
- Total Carbohydrates: 60g
- Dietary Fiber: 2g
- Sugars: 45g
- Protein: 6g
Healthier Alternatives to the Classic Butterfinger Cake Recipe
If you’re looking to lighten up this recipe, consider the following modifications:
- Reduced-Fat Whipped Topping: Use a reduced-fat or sugar-free version of whipped topping to cut down on calories and sugar.
- Homemade Caramel Sauce: Make your own caramel sauce using coconut sugar or a sugar substitute to reduce the sugar content.
- Dark Chocolate Cake Mix: Opt for a dark chocolate cake mix, which generally has less sugar and more antioxidants than milk chocolate.
- Portion Control: Cut the cake into smaller pieces to reduce the calorie intake per serving. This cake is rich enough that even a small slice will satisfy your sweet tooth.
The Joy of Baking and Sharing
One of the most rewarding aspects of baking is sharing your creations with others. This Butterfinger Cake is a crowd-pleaser, perfect for potlucks, birthdays, or any gathering where you want to impress with a decadent dessert. The combination of chocolate, caramel, and Butterfinger is universally loved, making this cake a surefire hit.
Personal Anecdote
I first made this Butterfinger Cake for a family gathering, and it quickly became a favorite. The moment I pulled it out of the fridge, everyone’s eyes lit up. As soon as they took their first bite, I knew I had a winner on my hands. The cake disappeared within minutes, with people coming back for seconds (and even thirds!). Now, it’s a requested dessert at almost every family event. The best part? It’s so easy to make, yet it looks and tastes like it took hours.
Frequently Asked Questions About Butterfinger Cake Recipe
Can I use a different type of cake mix?
Yes! While chocolate cake is the classic choice, you can experiment with other flavors like vanilla or peanut butter. Each will give the cake a different but equally delicious twist.
What if I don’t have Butterfinger candy bars?
No problem! You can use any crunchy, peanut butter-flavored candy or even a combination of peanut butter chips and chocolate chips.
Can I freeze Butterfinger Cake?
Yes, you can freeze Butterfinger Cake. Wrap it tightly in plastic wrap and then in aluminum foil to prevent freezer burn. Thaw in the refrigerator before serving. Note that the texture of the whipped topping and Butterfinger pieces may change slightly after freezing.
How long does Butterfinger Cake last in the refrigerator?
When stored properly in an airtight container, Butterfinger Cake can last up to 4 days in the refrigerator. However, for the best texture, it’s recommended to enjoy it within 2 days.
Conclusion
This Butterfinger Cake recipe is a delightful combination of flavors and textures that will satisfy any sweet tooth. Whether you’re making it for a special occasion or just because, it’s sure to become a favorite in your dessert repertoire. The best part is that it’s easy to make, even for those who aren’t seasoned bakers. So, gather your ingredients, follow the steps, and get ready to enjoy a slice of heaven. Happy baking!